I’ve decided to write a little tutorial on how to to write Android malware and trojans. Many people are familiar with malware writing on Windows (or Linux) but not Android. It works slightly different, but is very easy as we will see. This is the agenda that I have so far:
Part 1 – Autostart on boot
Part 2 – Get phone number, IMSI, IMEI, …
Part 3 – Send information to website (do a HTTP-POST request)
Part 4 – Check WiFi connection, run when phone charging
Part 5 – Get user location
Part 6 – Vibrate the phone on special events and sum up
Part 7 – Hide application icon
Part 8 – Make it survive a phone wipe (persistence)
Part 9 – t.b.d. maybe receive sms, call history, steal cookies, install/uninstall apps, …
(Part 10? Use local exploits, cross-compile rootkits, … ?)
All you need is the SDK, which you can grad of the Google Developers site and a device to test.
Part 1 – Autostart on boot
Lets start making your Application autostart on boot. I will not go into the Android basics like Intents and Permissions, I assume that you have at least some basic knowledge. For Android starting your application at boot you need the “Uses Permission” android.permission.RECEIVE_BOOT_COMPLETED into the Android Manifest:
In Eclipse just add a source file, lets call it “BOOTReceiver.java“. This file will contain the code, that will be run on boot. It could look like this:
public class BOOTReceiver extends BroadcastReceiver{
  static final String ACTION="android.intent.action.BOOT_COMPLETED";

  @Override
  public void onReceive(Context context, Intent intent) {
      // Do something, Hello World?
            // Here is my code which will start my MainActivity
            Intent i = new Intent(context, MainActivity.class);
      i.addFlags(Intent.FLAG_ACTIVITY_NEW_TASK);
      context.startActivity(i);
  }
}
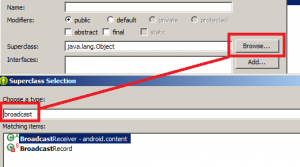
Hint: Eclipse will handle most of the code for you, if you tell him the superclass (the class from which we derive):

(If your read carefully, you will notice that it says BroadcastReceiver not BootReceiver. Android itself handles all Events as Broadcast and in the next step we tell Android to launch our code only on BOOT_COMPLETED. )
So, we need to tell Android, that not only we have code to run and we need the Permissions, we even want it to be run! We will add a Receiver and an Intent Filter (to filter on which events this code will be run). This will make Android run the class we specify after boot.
Go back to the Manifest Editor to the Application Tab and add them like this:
That’s it for Part 1! You now have an application that does absolutely nothing and it does it anytime your phone boots! If you have connected your phone to your computer and installed the drivers you can “Run” in Eclipse and it will push the application on your device and run it. You will have to enable USB debugging on the device. The drivers are bundled in the SDK. Reboot your device to see your app starting! :-)


Hi
Very nice and informative tutorial series.
I am a student at IIIT Hyderabad, India. Am interested in leaning more about android malware. Can you point me to resources where I can download malicious apps for learning purpose.
[…] mentioned in the first post, I’d like to add just one simple function here and sum […]
nice work….i dont understand the permissions work in the manifest
What dont you understand?
Thanks….I have a fix $$$i was working on a project “The big Mind” …you codes was helpful$$ I hope to complete the project on cross platform soon …in a couple of years…# still working on the cryptography and algorithms
can you tell me that how we make an android malware app
that erase all user data